Category Archives: EISA

Enterprise Information Security Architecture

Do SSDLC Programs Really Work, or: How to Measure Success (2)

In last week’s post, we discussed a few Secure Software Development Lifecycle (SSDLC) metrics that I personally find very interesting. The four metrics are:

  1. The number of qualified defects found per quarter
  2. The number of qualified defects fixed per quarter
  3. The difference between [1] and [2], that is, inflow vs outflow
  4. The overall number of open qualified security defects

In this post, I will share metrics and a graph of the number of qualified security defects that have been fixed, and their development over time. As mentioned in the previous post, the data used to plot the graphs has been anonymized, randomized, and transformed into a relative scale. These transformations are necessary to protect confidential information, but have been performed in a way that does not affect the trends that are typically seen when an SSDLC program is rolled out. All percentages in the graph are relative to the results of the 20 Quarters before the SSDLC program was started.

Number of Qualified Defects Fixed per Quarter

The graph below is a hypothetical metric of the same organization discussed previously, in the same time period. It shows the anonymized and transformed results of the efforts the organization went through to close security defects.

2014-09-19 - Security Defects Metrics - Graph 2

As with the previous graph, we see a slow start. However, once the number of newly discovered defects grow, the fix rates start to go up. There can be many reasons for this behavior. Common reasons for this are typically a combination of buy-in to the program by executive management and buy-in from engineering: In a mature software organization, engineers take responsibility for their deliveries, and create pressure to deal with critical issues rather than delaying them. Often, engineering programs are most successful if both factors are present.

In the organization we use in this example, we see that R&D fixed more (about 35%!) qualified security defects in a single quarter than they did in the previous 5 years, which is an efficiency increase of several thousand percent – and this organization was still in the growing phase during Quarter 9!

Edit: continue reading…

Do SSDLC Programs Really Work, or: How to Measure Success (1)

When discussing Secure Software Development Lifecycle (SSDLC) programs, I get asked a lot whether such an investment is actually worth the effort, or whether it would be better to invest the available resources differently. It is true that running an SSDLC program actively is a big investment, and – as with any business expense – it is very reasonable to evaluate the ROI of these expenses.

As with any engineering program, having solid data is a must when communicating results to upper management. In particular the C-suite of management will request metrics that actually show that the program works as expected.

While there are dozens of metrics that can be collected when executing the SSDLC, I find four metrics particularly interesting. They deal with the inflow and processing of security defects in an organization’s portfolio. Eventually, most “relevant” findings from an SSDLC activity that are actually tracked somewhere (instead of being fixed immediately) are either security defects or security requirements. Security requirement findings are a lot harder to quantify than security defects, because they are bound to a product’s target market, that is, how a product is being used and deployed. Two identical products that are selling to two different target markets may have very different sets of security requirements. For security defects, this is similar to a certain extent. However, a security defect is usually a security defect, and only the severity rating that is attached to it changes with target markets and deployments. This makes security defects a metric which is very easy to quantify and compare.

The four metrics we will discuss in the following are:

  1. The number of qualified defects found per quarter
  2. The number of qualified defects fixed per quarter
  3. The difference between [1] and [2], that is, inflow vs outflow
  4. The overall number of open qualified security defects

During my tenure at HP, I helped several organizations within HP introduce and successfully run SSDLC programs. Such organizations in HP may be business units or groups of product teams. The data provided in this series of posts is constructed based on data I collected from an R&D organization in HP with a few hundred R&D engineers. For obvious reasons, I cannot reveal from which exact organization and what exact product set the data was derived from. To maintain additional confidentiality, I took data that is several years old and not current, changed the numbers in a way that would not change the overall pattern, and then transformed it into a relative scale. These transformations do not affected the trends in the graph, which makes the anonymized (and somewhat randomized) data good enough for this series of posts.

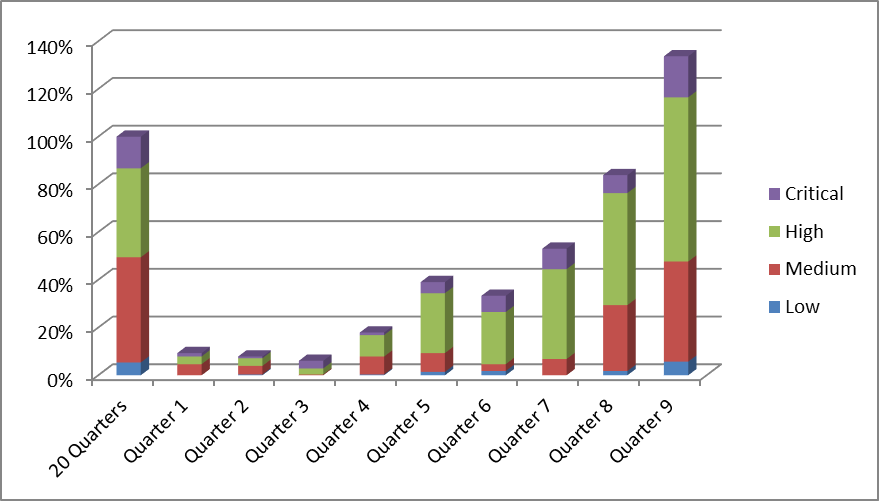
Number of Qualified Defects Found Per Quarter

The figure below shows the number of issues found per quarter over a time period of 10 (i.e. 9 plus 1) quarters, broken up into low, medium, high, and critical severity defects: this particular organization had a history of 20 quarters of security activities. All the results that were achieved in these 5 years are represented in the “20 Quarters” bar. The bars for Quarter 1 to Quarter 9 represent data points after the organization decided to introduce an SSDLC program. Note that all data points are relative to the results of the first 20 Quarters, as the absolute numbers are confidential and cannot be published.

2014-09-19 - Security Defects Metrics - Graph 1

The graph shows that the program started slowly, with the number of newly reported security defects per quarter being in the 10% range of the previous 20 Quarters. Then it gained traction, roughly doubling this number to about 25% per quarter relative to what was reported in the overall 20 Quarters before the program was initiated. After Quarter 7, the program really took off, and started to show fast growth on newly discovered defects.

This is a very typical pattern. Depending on the size of the organization, it usually takes 6 to 9 months after real activities (i.e. more than Powerpoint activities) have started to see any significant results. Once a few big teams or lighthouse projects within the organization are fully on board, and see the first encouraging results for their projects, managers start investing more resources and engineers start to develop a higher level of security awareness. At this point, we often see an exponential growth until a saturation level is reached, and then a slight decline to a stable level.

In this particular example, we see that this organization (which at the time was still in the growing phase) managed to find almost as many (about 75%) qualified security defects in a single quarter than they did in the previous 5 years.

Edit: continue reading…

Configure PMD in Multi-Module Maven Builds

Similar to Checkstyle, the execution of PMD can be both automated in developer builds and in the CI/CD environment, and at the same time use a centralized configuration artifact for the PMD rules setup.

The “Maven PMD Plugin” can be used to integrate PMD into Maven builds. The plugin actually performs two tasks: First the PMD analysis and second a “copy and paste” detection, where the plugin tries to detect reuse of code by copy and paste rather than language specific code reuse mechanisms. The plugin can execute multiple goals for these checks (“pmd” and “cpd”) and there are variants of these goals that fail the build in case of a rule violation (using “check” instead of “pmd” and “cpd-check” instead of “cpd”). By setting up a Maven profile for release builds, developers can create local rule violation reports in their build environment, and the CI/CD system can fail the build in case of rule violations.

The configuration below sets up a default configuration of the PMD plugin which allows a developer to execute the PMD checks with the “mvn clean install” command. In case of rule violations, the developer build is configured to not fail, but instead create data for reports. Some of the configuration settings are parameterized with Maven build variables, but the configuration works the same way when these settings are being hardcoded.

In this example, we use a configuration artifact (jar resource file) for the PMD rules configuration. The “dependency” section pulls in the configuration artifact, and the “ruleset” parameter points to the PMD rules configuration in the resource configuration artifact. This filename must match the actual rules filename used in the dependency. Note that PMD performs a JDK specific analysis, and thus requires to specify the JDK version. This should match the JDK version configured in the Maven Compiler Plugin.

<build>
  ...
  <plugins>
  ...
    <plugin>
      <groupId>org.apache.maven.plugins</groupId>
      <artifactId>maven-pmd-plugin</artifactId>
      <version>${mavenPmdPluginVersion}</version>
      <configuration>
        <linkXref>true</linkXref>
        <sourceEncoding>${project.build.sourceEncoding}</sourceEncoding>
        <minimumTokens>100</minimumTokens>
        <targetJdk>${javaVersion}</targetJdk>
        <rulesets>
          <ruleset>pmd-rules.xml</ruleset>
        </rulesets>
      </configuration>
      <dependencies>
        <dependency>
          <groupId>${buildToolsGroupId}</groupId>
          <artifactId>${buildToolsArtifactId}</artifactId>
          <version>${buildToolsVersion}</version>
        </dependency>
      </dependencies>
      <executions>
        <execution>
          <phase>validate</phase>
          <goals>
            <goal>pmd</goal>
            <goal>cpd</goal>
          </goals>
        </execution>
      </executions>
    </plugin>
  ...
  </plugins>
  ...
</build>

For the automated continuous integration (CI) build, we use a very similar variant of the configuration in a profile. For the CI build, the plugin is using the two alternate goals to fail the build in case of a rules violation:

<profiles>
  ...
  <profile>
    <id>release</id>
    ...
    <build>
      <plugins>
      ...
        <plugin>
          <groupId>org.apache.maven.plugins</groupId>
          <artifactId>maven-pmd-plugin</artifactId>
          <version>${mavenPmdPluginVersion}</version>
          <configuration>
            <linkXref>true</linkXref>
            <sourceEncoding>${project.build.sourceEncoding}</sourceEncoding>
            <minimumTokens>100</minimumTokens>
            <targetJdk>${javaVersion}</targetJdk>
            <rulesets>
              <ruleset>pmd-rules.xml</ruleset>
            </rulesets>
          </configuration>
          <dependencies>
            <dependency>
              <groupId>${buildToolsGroupId}</groupId>
              <artifactId>${buildToolsArtifactId}</artifactId>
              <version>${buildToolsVersion}</version>
            </dependency>
          </dependencies>
          <executions>
            <execution>
              <phase>validate</phase>
              <goals>
                <goal>check</goal>
                <goal>cpd-check</goal>
              </goals>
            </execution>
          </executions>
        </plugin>
        ...
      </plugins>
      ...
    </build>
    ...
  </profile>
  ...
</profiles>

To create a graphical PMD and CPD report with the “mvn site” command, the Maven PMD plugin can be configured to render the results from the anlysis phase into an html report. To enable this functionality and automatically include the reports in the project’s site report, add the following code to the “reporting” section in the POM file (in addition to the plugin configuration in the “build” section):

<reporting>
  ...
  <plugins>
  ...
    <plugin>
      <groupId>org.apache.maven.plugins</groupId>
      <artifactId>maven-pmd-plugin</artifactId>
      <version>${mavenPmdPluginVersion}</version>
      <configuration>
        <linkXref>true</linkXref>
        <sourceEncoding>${project.build.sourceEncoding}</sourceEncoding>
        <minimumTokens>100</minimumTokens>
        <skipEmptyReport>false</skipEmptyReport>
        <targetJdk>${javaVersion}</targetJdk>
        <rulesets>
          <ruleset>pmd-rules.xml</ruleset>
        </rulesets>
      </configuration>
    </plugin>
  ...
  </plugins>
  ...
</reporting>

To create the graphical report, the plugin uses the analysis results that are already present in the “target” directory of an artifact, and then transforms them into a graphical representation. This is why the configuration does not have a dependency on the PMD configuration artifact.

Note that this plugin needs the JXR plugin to be executed beforehand if it should provide cross-references to the source code in its reports.

Edit: See https://github.com/mbeiter/util for an example on how to configure the Maven PMD Plugin as described in this post for a multi-module build.

Create a PMD and a FindBugs Configuration as a Reusable Configuration Resource jar File

As with the Checkstyle configuration, it is often useful in centralized build environments to bundle the PMD rules into a dedicated jar file. The benefits of centralizing the FindBugs excludes file are, in my opinion, somewhat limited. While establishing a centralized set of Checkstyle and PMD rules often makes a lot of sense, the files to exclude from a FindBugs scan often depend on the sources of a particular project at hand, and are seldom generic enough to justify centralization.

The mechanism for creating a configuration resource artifact for PMD and FindBugs is very similar to the process used for Checkstyle: Create a new Maven project and store the PMD configuration file (e.g. pmd-rules.xml) and the FindBugs excludes file (e.g. findbugs-excludes.xml) in the src/main/resources folder. As with Checkstyle, there is no need to configure the PMD of FindBugs plugin for this Maven project. Once you have created the artifact, perform an “mvn deploy” and push the (versioned) artifact to a repository server.

Edit: See the “build-tools” project in https://github.com/mbeiter/util for an example on how to create PMD and FindBugs Maven configuration artifacts.

Improve Code Quality and Security by using Findbugs in Maven Builds

Other than Checkstyle and PMD, FindBugs is a general purpose code quality static code analysis tools that comes with dedicated checkers for security related defects. However, in over 400 FindBugs checkers, there are less than a dozen dedicated security checkers. This makes the security specific portion of FindBugs comparatively small.

Like Checkstyle and PMD, FindBugs can help developers writing better code by making them reflect about whether the code they are creating really does what they think it does. FindBugs can discover many rather subtle bug patterns that stem from incorrect language use, e.g. when doing comparisons, bit shift operations, and type conversions. In addition to that, it also covers many bug patterns around code correctness, multi-threading, and general best coding practices that a developer should generally follow. The FindBugs documentation provides an extensive list of what the latest release is covering.

FindBugs follows an interesting configuration pattern in so far as a developer cannot necessarily choose which checks to execute, but rather controls the precision of the analysis and then creates a filter file during result auditing:

  • Instead of specifying a list of checks to run, FindBugs takes an “effort” parameter that specifies how “precise” the analysis should be, and a “threshold” value that determines a severity threshold that a bug must exceed to be reported. More effort means more CPU time and memory being spent on the analysis. Lower threshold results in more of the bugs that have been found being actually reported.
  • FindBugs allows to ignore (“filter”) certain bug categories in the reported result list down to a single class/method level, as well as exclude specific files and file patterns from the analysis. The manual gives a great example on the fine granularity of the filter mechanism.

The filter configuration basically represents the result audit, as it is required to add a new filter entry for every false positive that should be removed from the report. This is somewhat clumsy, because it separates the audit tracking from the code, and FindBugs cannot easily recover in case code that has been previously audited is being refactored. Other tools work with annotations (e.g. PMD) or comments (e.g. Checkstyle) that are embedded directly into the code, which bundles the audit results with the code and therefore allows both atomically revision controlled and more refactoring safe source code auditing.

Secure Static Code Analysis with the Maven PMD Plugin

Similar to Checkstyle, PMD is a static code analysis tool that is targeted more toward improving code quality than explicitly scanning for security problems. PMD does promote certain aspects that have indirect effects on product security, which is why I usually recommend using it regularly during development.

Many security defects are introduced because code is overly complex or because developers do not deeply care about or understand the code that they are writing. Copy and pasting (e.g. from blogs, Stack Overflow, …) contributes to this effect. I have had the experience that with increasing code quality, the number of security defects decreases. This is not because a tool like PMD makes developers smarter, I think this is because a tool like PMD can help force developers to think about the code they are writing, and to spot obvious blunders that may later on lead to security issues.


PMD is applying “rules” on the code, with each “rule” describing desired (or: undesired) code structures. PMD comes with a huge set of rules, and choosing the best rules for a project is not always easy: some of the rules are controversial in the first place (they are conveniently placed in the “controversial” ruleset package), others may be contradicting. Users can create additional (custom) rules, and add them to the rule set as needed.

Security reviewers are generally very appreciate of code that is easy to follow. The “basic”, “code size”, “coupling”, and “design” rule sets are particularly helpful for creating easily readable code. This also has the nice benefit that such code is easy to maintain. No more “what did I want to achieve with this somewhat overly optimized block of code that has more double negotiations in it than the CEO’s last speech on salary increases” situations after coming back from vacation.

PMD is very good at discovering dead code, overly complicated expressions, and code that has a high formal complexity (e.g. NCSS, cyclomatic complexity, NPath complexity, field and parameter counts, etc) – all of which can eventually lead to security problems due to complexity-induced incorrect code usage. PMD helps developers to truly remove of this hand-optimized code, and leave that kind of work to the compiler. At the same time, PMD can also spot inefficient code, and help the developer to manually optimize where a human brain is actually smarter than the compiler.

In combination with Checkstyle, PMD can catch a lot of bad coding habits.


The available rules change frequently with new PMD releases. A current list (for the 5.1.1 release) is available here.

Edit: See the “build-tools” project in https://github.com/mbeiter/util for a starting point for creating a PMD ruleset definition. The rules configured in this project are the ones that I personally find generally useful. Keep in mind that this really is only a starting point, as each project may have individual needs for an optimal rule set depending on the data it is processing, how it is operated, etc pp.

Configure Checkstyle in Multi-Module Maven Builds

Properly configuring Checkstyle is a good first step, and encapsulating the Checkstyle rules into a resusable configuration resource jar file really helps setting up centralized rules control and auditing in enterprise build environments. The next step is to automate Checkstyle execution in both developer builds and in the CI/CD environment.

There is a plugin available for Maven that allows executing Checkstyle as part of every build. The plugin can be configured to either fail or not fail the build if rule violations have been discovered. In combination with Maven’s profiles, this allows configuring Checkstyle to create a report of violations in local developer builds, and fail the build in case of rule violations when the artifact is built on a centralized continuous integration build system.

The configuration below sets up the developer build as the “default build”, which allows a developer to execute the Checkstyle checks with the “mvn clean install” they use on their local system. This developer build is configured not failing the build. It also uses the Checkstyle configuration resource file. Note that some of the configuration settings (e.g. the versions of the artifacts) are parameterized, but the configuration works the same way when no parameters, but hardcoded values, are being used.

In the example below, the “dependency” section pulls in the configuration artifact, and the “configLocation” parameter points to the Checkstyle rules configuration in the resource configuration artifact. This filename must match the actual rules filename used in the dependency.

<build>
  ...
  <plugins>
    ...
    <plugin>
      <groupId>org.apache.maven.plugins</groupId>
      <artifactId>maven-checkstyle-plugin</artifactId>
      <version>${mavenCheckstylePluginVersion}</version>
      <dependencies>
        <dependency>
          <groupId>${buildToolsGroupId}</groupId>
          <artifactId>${buildToolsArtifactId}</artifactId>
          <version>${buildToolsVersion}</version>
        </dependency>
      </dependencies>
      <executions>
        <execution>
          <phase>validate</phase>
          <configuration>
            <configLocation>checkstyle.xml</configLocation>
            <encoding>${project.build.sourceEncoding}</encoding>
            <consoleOutput>true</consoleOutput>
            <failOnViolation>false</failOnViolation>
            <failsOnError>false</failsOnError>
          </configuration>
          <goals>
            <goal>check</goal>
          </goals>
        </execution>
      </executions>
    </plugin>
    ...
  </plugins>
  ...
</build>

The CI/CD build uses a very similar plugin configuration in a profile, with the difference that the build is configured to fail in case of a rules violation:

<profiles>
  ...
  <profile>
    <id>release</id>
    ...
    <build>
      <plugins>
        ...
          <plugin>
            <groupId>org.apache.maven.plugins</groupId>
            <artifactId>maven-checkstyle-plugin</artifactId>
            <version>${mavenCheckstylePluginVersion}</version>
            <dependencies>
              <dependency>
                <groupId>${buildToolsGroupId}</groupId>
                <artifactId>${buildToolsArtifactId}</artifactId>
                <version>${buildToolsVersion}</version>
              </dependency>
            </dependencies>
            <executions>
              <execution>
                <phase>validate</phase>
                <configuration>
                  <configLocation>checkstyle.xml</configLocation>
                  <encoding>${project.build.sourceEncoding}</encoding>
                  <consoleOutput>true</consoleOutput>
                  <failOnViolation>true</failOnViolation>
                  <failsOnError>true</failsOnError>
                </configuration>
                <goals>
                  <goal>check</goal>
                </goals>
              </execution>
            </executions>
          </plugin>
          ...
        </plugins>
        ...
      </build>
    ...
    </profile>
  ...
</profiles>

Maven optionally provides the functionality to create nice graphical reports by invoking “mvn site”. The Maven Checkstyle plugin can be configured to turn the results discovered in the anlysis phase into an html report that is automatically included in the project’s site report. To enable this functionality, the Checkstyle plugin is additionally added to the “reporting” section in the POM file:

<reporting>
  ...
  <plugins>
    ...
    <plugin>
      <groupId>org.apache.maven.plugins</groupId>
      <artifactId>maven-checkstyle-plugin</artifactId>
      <version>${mavenCheckstylePluginVersion}</version>
      <configuration>
        <configLocation>checkstyle.xml</configLocation>
        <encoding>${project.build.sourceEncoding}</encoding>
      </configuration>
      <reportSets>
        <reportSet>
          <reports>
            <report>checkstyle</report>
          </reports>
        </reportSet>
      </reportSets>
    </plugin>
    ...
  </plugins>
  ...
</reporting>

Note that the plugin configuration in the “reporting” section does not have a reference to the Checkstyle configuration resource file. The way that reporting plugins often work in Maven is that they take analysis results that are already present in the “target” directory of an artifact, and then transform them into a graphical representation. The Checkstyle plugin is no exception to this rule.

Note that this plugin needs the JXR plugin to be executed beforehand if it should provide cross-references to the source code in its reports.

Edit:See https://github.com/mbeiter/util for an example on how to configure the Maven Checkstyle Plugin as described in this post for a multi-module build.

Create a Checkstyle Configuration as a Reusable Configuration Resource jar File

When establishing a centralized build environment, it is often useful to bundle the Checkstyle rules into a dedicated jar file. This allows the creation of a Checkstyle configuration that can be easily shared across more than one project. It also removes the rules from the direct control of a specific project’s dev team. This split of responsibility is always a good thing from a security perspective, as it prevents unauthorized “shortcuts” and allows for centralized auditing of code quality rules.

To create a central Checkstyle configuration artifact, create a new Maven project and store the Checkstyle configuration file (e.g. checkstyle.xml) in the src/main/resources folder. There is no need to configure the Checkstyle plugin for this Maven project as it does not hold any source code: It is a mere container to store the Checkstyle configuration file and make it available on a Maven repository server for consumption by other projects. Once you have created the artifact, perform a “mvn deploy” and push the (versioned) artifact to a repository server.

Edit:See the “build-tools” project in https://github.com/mbeiter/util for an example on how to create a Checkstyle Maven configuration artifact.

Checkstyle as a Security Static Code Analysis Tool

Checkstyle is often perceived as a tool to solely enforce code formatting standards. And it really does a great job with that – without Checkstyle, a project with five developers would have ten different coding styles. Or thousands, considering what some of the “Knights of the Copy and Paste” are sometimes capable doing to innocent sourcecode.

However, Checkstyle does a lot more than just enforce code formatting rules. Checkstyle really is a tool to enforce coding standards, which includes much more than mere code formatting and layouting. For example, Checkstyle can also detect poor class and method designs. This makes it a very helpful tool to define rules and coding best practices, and enforce them in the project.

I find three aspects of Checkstyle particularly useful for security static code analysis:

  • Enforce of a common coding style, which includes format / layout.
    This helps tremendously during code reviews: The time of a security expert doing code reviews is extremely valuable. They charge high rates, and they cannot do the job for long periods of time before getting tired and begin to miss things. If the project (or even an organization) uses a single style consistently, then this means less ramp up time for the security reviewer, and less time to review the code.
  • Prevents developers from violating best coding practices.
    There are many discussions around which “best practices” really are “best practices”. However, eventually someone in a project team must make the call, and define what code constructions should and should not be used. Bloch gives some good examples in his books (e.g. Effective Java 2nd Edition – still a great resource even though it is a little dated: https://cebulko.com/Programming-Resources/Effective%20Java%20-%202nd%20Edition.pdf), and Checkstyle can help to enforce a lot of them. Some really useful checks are the various complexity checks. If these fail, then this is almost always an indication of poor class design.
  • Forces creation of proper code and API documentation.
    Let’s face it: most developers do not like writing documentation. The minimum amount of documentation that a developer should include in a commit are the API docs, e.g. in form of Javadocs. Without proper API documentation, security code reviews are extremely difficult. Re-use of such code is also difficult, which makes useful API documentation a good investment in the first place.

Checkstyle is highly configurable through “checkers”, with each “checker” performing a specific analysis task. The checkers themselves often have various options to fine-tune how the checker exactly works, and what variants / specifics of a rule it should enforce.

An overview of all currently supported checkers is available here. A good starting point when creating a Checkstyle configuration for a new project are the Sun and Google reference configurations. They provide very useful defaults, and it is often much easier to start e.g. from the Sun configuration and tweak it, rather than create a configuration from scratch.

Enforce Dependency Management Policies with the Maven Dependency Plugin

A non-trivial application will typically rely on a multitude of libraries to provide basic functions. The complexity of such “dependencies” ranges anywhere from functions for basic datastructure manipulation to fully-featured socket server implementations. Much of this code is provided by third parties, and conveniently made available to build systems through large (public) repository servers like Maven Central.

In an application that is using these dependencies, third party code will ultimately handle user provided input. This opens up questions around security and policy compliance. As an example, an organization may want to ensure that dependencies with known security vulnerabilities are not being used in production code. There might also be dependencies that are only available under very restrictive license terms (e.g. GPL), and using them e.g. in a closed source product may be a policy violation. Further examples for policy violations may include governmental restrictions, such as export restrictions.

The Maven Dependency Plugin allows creating a project’s “dependency tree”, that is, a list of all direct and indirect (“transitive”) dependencies of a project. This tree can be stored in a text file for every module in a multi-module Maven build, and then be processed in a post-build step to scan, for example, for policy compliance of the presence / absence of specific versions of well-defined dependencies.


Specifying all dependencies in Maven’s DependencyManagement sections, preferably in a dedicated / high level (e.g. root) POM file ensures that all modules of a Maven project use the same version of a specific dependency. This greatly simplifies dependency management in a project, because there is no risk of contradicting dependency specifications. In particular when updating a dependency in a sub module, using Maven’s DependencyManagement sections makes it unnecessary to update that same dependency in a different (possible seldom changed) sub-module of the same project. Note that it is possible to have a DependencyManagement section in every PMO file, augmenting each other as the build progresses a project’s modules from the root to the leaves. This allows having multiple versions of the same dependency in a project if such a configuration would be required for valid reasons – and at the same time forces that such a decision is consciously made and explicitly documented in the POM files by creating appropriate entries in the various DependencyManagement sections.


The configuration example below shows how the Maven Dependency Plugin can be used to enforce that all dependency versions must be specified in a DependencyManagement section, and at the same time create a text file for each sub module with a fully qualified list (group ID, artifact ID, version, scope) of all direct and transitive module dependencies.

<build>
  ...
  <plugins>
    ...
    <plugin>
      <groupId>org.apache.maven.plugins</groupId>
      <artifactId>maven-dependency-plugin</artifactId>
      <version>${mavenDependencyPluginVersion}</version>
      <executions>
        <execution>
          <id>dep-resolve</id>
          <phase>validate</phase>
          <goals>
            <goal>resolve</goal>
          </goals>
          <configuration>
            <excludeTransitive>false</excludeTransitive>
            <outputFile>${project.build.directory}/dep_current.txt</outputFile>
          </configuration>
        </execution>
        <execution>
          <id>analyze-dep-mgt</id>
          <phase>validate</phase>
          <goals>
            <goal>analyze-dep-mgt</goal>
          </goals>
          <configuration>
            <failBuild>true</failBuild>
            <ignoreDirect>false</ignoreDirect>
          </configuration>
        </execution>
      </executions>
    </plugin>
    ...
  </plugins>
  ...
</build>

Edit:See https://github.com/mbeiter/util for an example on how to configure the Maven Dependency Plugin as described in this post for a multi-module build.